Tampilkan postingan dengan label navigation menu. Tampilkan semua postingan

How to Add Neat CSS3 Dropdown Menu in Blogger

Here's another simple yet amazing dropdown menu with pure CSS3 made by Andrew from script-tutorials.com to which I have made some slight modifications so that it could easily adapt in our Blogger template.

In the upper right corner of this menu we have the contact links and the social media icons for Facebook, Twitter, Google Plus and RSS feed. Below these links, we have the drop-down navigation menu and on the left side, the search form.
To achieve better user interface and interaction, the CSS dropdown menu features sub categories that appear with a nice touch of CSS3 box-shadow, text-shadow and a cool transition once the parent link is activated by a hover.

dropdown menu

Please visit this demo page to see it in action.

Adding the CSS dropdown navigation menu in Blogger

Step 1. Access your Blogger Dashboard and go to Template > click on the Edit HTML button


Step 2. Click anywhere inside the code area and press the CTRL + F keys to open the search box. Type the tag below inside the search box and hit Enter to find it.
</header>
Step 3. Just below </header> add the HTML structure:
<div id='contact-links'>
    <div id='my-links'>
        <a href='#'>About</a>
        <a href='#'>Contact</a>
                <a href='#'><img height='18px' src='https://blogger.googleusercontent.com/img/b/R29vZ2xl/AVvXsEhXJzJ2sZ36W_wy4R5M8PrH_Fq3mmFZC5qVMRWbfXrJREhe0hbvQO3SvDDSN5DsmLtQ2dMJ_zEXyYzyuBkpHA9l8vGpiCb_htGqXvSolwfLjqfLOGKyG_aXBftqPGBcmklYHp0NKfIRQ-bG/s1600/facebook-icon.png' title='Facebook' width='18px'/></a>
<a href='#'><img height='18px' src='https://blogger.googleusercontent.com/img/b/R29vZ2xl/AVvXsEhU1uBQbvxpihqm99Eu_2Itf34bDXP3AnRVjBX5kgWJ4zXb-9libbcl5_q87wD3YPlRLGyV2UlTNxcW29ZUSVFO6n9D0VwQFL2dxzDIss7-1fk_2A-ev6pd2LJ_uwx9aT2-P2UZjnIfLs65/s1600/twitter.png' title='Twitter' width='18px' /></a>
        <a href='#'><img height='18px' src='https://blogger.googleusercontent.com/img/b/R29vZ2xl/AVvXsEg2H7o7JmZch_ReAgcLSxixHvHtqouMehsnoQfIPciAXakNyzIvUbs19V_N1LrXaIZLg5b5v5qsugseMRadBPRDBUwlH2pGV_-zlUK29YR1hfw0SP1Ydks7v70w9LyaocYQGi_xqEifd9ar/s1600/google-plus-icon.png' title='Google' width='18px'/></a>
        <a href='#'><img height='18px' src='https://blogger.googleusercontent.com/img/b/R29vZ2xl/AVvXsEj1I12ztyl_LL0WtkqJRrAjqTwTzeAzLN1hyphenhyphenTVX20pKxeizyhbVGPfW2byBnaELCbPfrR33iQIUxXUcDTTVPhRA-mPu4POTpsL-KWmfQOjvptMZlzj3OWEiQD_7smV4hai8aySL1zGB94Vk/s1600/rss-icon.png' title='RSS Feed' width='18px'/></a>
    </div>

    <div id='menu-container'>
        <nav id='neat-menu'>
            <ul>
              <li class='active'><a href='/'>Home</a></li>
                <li><a href='#'>Dropdown</a>
                    <ul>
                        <li><a href='#'>Menu element 1</a></li>
                        <li><a href='#'>Menu element 2</a></li>
                        <li><a href='#'>Menu element 3</a></li>
                        <li><a href='#'>Menu element 4</a></li>
                        <li><a href='#'>Menu element 5</a></li>
                    </ul>
                </li>
                <li><a href='#'>Single Menu</a></li>
                <li><a href='#'>Single Menu</a></li>
                <li><a href='#'>Dropdown</a>
                    <ul>
                        <li><a href='#'>Menu element 1</a></li>
                        <li><a href='#'>Menu element 2</a></li>
                        <li><a href='#'>Menu element 3</a></li>
                        <li><a href='#'>Menu element 4</a></li>
                        <li><a href='#'>Menu element 5</a></li>
                    </ul>
                </li>
            </ul>
        </nav>

        <!-- menu-search form -->
        <div id='menu-search'>
          <form method='get' action='/search'>
                <input autocomplete='off' name='q' placeholder='search...' type='text' value=''/>
            </form>
        </div>
    </div>
</div>
Replace the # symbols with the URLs of your links and replace the texts in blue with the titles that you want to appear. To change the social media icons, add the links of your icons instead of the ones in blue. If you don't know how to upload and get the URL of an image, please read this tutorial.

If you want to remove the sub categories, remove the code within the tags highlighted in yellow, including the ul tags. To remove only a menu element, remove the part that starts with <li> and ends with </li>

Step 4. And now let's add the CSS styling for the menu. Search for the following piece of code:
]]></b:skin>
Just above ]]></b:skin> add this code:
#contact-links {
    text-shadow: 0 -1px 0 rgba(0, 0, 0, 0.3);
    margin: auto;
    position: relative;
    width: 100%;
}
#contact-links a {
    color: #4C9FEB;
}
#contact-links a:hover {
    color: #3D85C6;
}
#my-links {
    float: right;
    font-size: 12px;
    margin: 4px 10px;
    overflow: hidden;
    text-shadow: 0 1px 0 #FFFFFF;
}
#my-links a {
    margin-left: 7px;
    padding-left: 8px;
    text-decoration: none;
}
#my-links a:first-child {
    border-width: 0;
}
#menu-container {
    background: -webkit-linear-gradient(#f6f6f6, #e9eaea) repeat scroll 0 0 transparent;
    background: -moz-linear-gradient(#f6f6f6, #e9eaea) repeat scroll 0 0 transparent;
    background: linear-gradient(#f6f6f6, #e9eaea) repeat scroll 0 0 transparent;
    filter: progid:DXImageTransform.Microsoft.gradient( startColorstr='#f6f6f6', endColorstr='#e9eaea',GradientType=0 );
    border-radius: 0 0 4px 4px;
border:1px solid rgba(0,0,0,0.1);
    box-shadow: -1px 1px 0 rgba(255, 255, 255, 0.8) inset;
    clear: both;
    height: 46px;
    padding-top: 1px;
}
#neat-menu {
    float: left;
}
#neat-menu a {
    text-decoration: none;
}
#neat-menu ul {
    list-style: none;
    margin: 0;
    padding: 0;
}
#neat-menu > ul > li {
    float: left;
    padding-bottom: 12px;
}
#neat-menu ul li a {
    box-shadow: -1px 0 0 rgba(255, 255, 255, 0.8) inset, 1px 0 0 rgba(255, 255, 255, 0.8) inset;
    border-color: #D1D1D1;
    border-image: none;
    border-style: solid;
    border-width: 0 1px 0 0;
    color: #333333;
    display: block;
    font-size: 14px;
    height: 25px;
    line-height: 25px;
    padding: 11px 15px 10px;
    text-shadow: 0 1px 0 #FFFFFF;
}
#neat-menu ul li a:hover {
background: -webkit-linear-gradient(#efefef, #e9eaea) repeat scroll 0 0 transparent;
    background: -moz-linear-gradient(#efefef, #e9eaea) repeat scroll 0 0 transparent;
    background: linear-gradient(#efefef, #e9eaea) repeat scroll 0 0 transparent;
    filter: progid:DXImageTransform.Microsoft.gradient( startColorstr='#efefef', endColorstr='#e9eaea',GradientType=0 );
}
#neat-menu > ul > li.active > a {
    background: -webkit-linear-gradient(#55A6F1, #3F96E5) repeat scroll 0 0 transparent;
    background: -moz-linear-gradient(#55A6F1, #3F96E5) repeat scroll 0 0 transparent;
    background: linear-gradient(#55A6F1, #3F96E5) repeat scroll 0 0 transparent;
    filter: progid:DXImageTransform.Microsoft.gradient( startColorstr='#55A6F1', endColorstr='#3F96E5',GradientType=0 );
    border-bottom: 1px solid #2D81CC;
    border-top: 1px solid #4791D6;
    box-shadow: -1px 0 0 #55A6F1 inset, 1px 0 0 #55A6F1 inset;
    color: #FFFFFF;
    margin: -1px 0 -1px -1px;
    text-shadow: 0 -1px 0 rgba(0, 0, 0, 0.3);
}
#neat-menu > ul > li.active > a:hover {
    background: -webkit-linear-gradient(#499FEE, #3F96E5) repeat scroll 0 0 transparent;
    background: -moz-linear-gradient(#499FEE, #3F96E5) repeat scroll 0 0 transparent;
    background: linear-gradient(#499FEE, #3F96E5) repeat scroll 0 0 transparent;
    filter: progid:DXImageTransform.Microsoft.gradient( startColorstr='#499FEE', endColorstr='#3F96E5',GradientType=0 );
}
#neat-menu > ul > li:first-child > a {
    border-radius: 0 0 0 5px;
}
#neat-menu ul ul {
    background: -webkit-linear-gradient(#F7F7F7, #F4F4F4) repeat scroll 0 0 padding-box transparent;
    background: -moz-linear-gradient(#F7F7F7, #F4F4F4) repeat scroll 0 0 padding-box transparent;
    background: linear-gradient(#F7F7F7, #F4F4F4) repeat scroll 0 0 padding-box transparent;
    filter: progid:DXImageTransform.Microsoft.gradient( startColorstr='#F7F7F7', endColorstr='#F4F4F4',GradientType=0 );
    border-radius: 5px 5px 5px 5px;
    border: 1px solid rgba(0, 0, 0, 0.1);
    box-shadow: 0 1px 0 #FFFFFF inset;
    height: 0;
    margin-top: 1px;
    opacity: 0;
    overflow: hidden;
    width: 240px;
    padding: 0;
    position: absolute;
    visibility: hidden;
    z-index: 1;
    -webkit-transition: all .5s;
    -moz-transition: all .5s;
    -ms-transition: all .5s;
    -o-transition: all .5s;
    transition: all .5s;
}
#neat-menu ul li:hover ul  {
    margin-top: 0\2;
    height: auto;
    opacity: 1;
    visibility: visible;
}
#neat-menu ul ul a {
    border-right-width: 0;
    border-top: 1px solid #D1D1D1;
    box-shadow: 0 1px 0 #FFFFFF inset;
    color: #444444;
    height: 24px;
    line-height: 24px;
    padding: 7px 12px;
    text-shadow: 0 1px 0 #FFFFFF;
}
#neat-menu ul ul a:hover {
background: -webkit-linear-gradient(#55A6F1, #3F96E5) repeat scroll 0 0 transparent;
    background: -moz-linear-gradient(#55A6F1, #3F96E5) repeat scroll 0 0 transparent;
    background: linear-gradient(#55A6F1, #3F96E5) repeat scroll 0 0 transparent;
    filter: progid:DXImageTransform.Microsoft.gradient( startColorstr='#55A6F1', endColorstr='#3F96E5',GradientType=0 );
    border-top: 1px solid #4791D6;
    box-shadow: -1px 0 0 #55A6F1 inset, 1px 0 0 #55A6F1 inset;
    color: #FFFFFF;
    text-shadow: 0 -1px 0 rgba(0, 0, 0, 0.3);
}
#neat-menu ul ul li:first-child a {
    border-top-width: 0;
}
#menu-search {
    margin:8px 10px 0 0;
    float: right;
}
#menu-search form {
    background: url("https://blogger.googleusercontent.com/img/b/R29vZ2xl/AVvXsEjfSFnFLItiBHjbMvyneTXIVdIW58OTN5wl0rpHX90MuATohk_MXbeBUZq2qQFYK-xpy1eUarXlxnjAv-kaAZybKoBaB_F669SkiLaqOFuYANVmuR-7VV_B1DpN8aFJUXI24WbsAO6m5XMy/s1600/menu-search.gif") no-repeat scroll 5% 50% transparent;
    border: 1px solid #CCCCCC;
    border-radius: 3px 3px 3px 3px;
    box-shadow: 0 1px 0 rgba(0, 0, 0, 0.05) inset, 0 1px 0 #FFFFFF;
    height: 26px;
    padding: 0 25px;
    position: relative;
    width: 130px;
}
#menu-search form:hover {
    background-color: #F9F9F9;
}
#menu-search form input {
    color: #999999;
    font-size: 13px;
    height: 26px;
    text-shadow: 0 1px 0 #FFFFFF;
    background: none repeat scroll 0 0 transparent;
    border: medium none;
    float: left;
    outline: medium none;
    padding: 0;
    width: 100%;
}
#menu-search form input.placeholder, #menu-search form input:-moz-placeholder {
    color: #C4C4C4;
}
Step 5. Click on the Save template button to save the changes... and you're done! ;)

I hope you like this CSS3 dropdown menu and if you enjoyed this tutorial, please share and subscribe.

How to Add an Admin Control Panel in Blogger

A while ago I've posted some tutorials on how you can remove the Blogger Navbar or add a Peek A Boo Effect so that it would show only when we mouse over on top of our page.

However, customizing or removing the Blogger Navbar also has its downside because the admin links for "New post", "Customize" and "Log Out" will be no longer visible and navigating through the blog functions could be really frustrating sometimes. When the navbar is visible, blog administrators can easily create a new post or customize their template with just one click; however, when the navbar is hidden, many more clicks are required to access the Blogger dashboard panel again.

So in this tutorial, we'll see how to add an "Admin Control Panel" menu with many cool additions such as:

- access to the Blogger's Homepage
- create a New Page or Post
- view all your posts
- read your comments
- access the Blog's layout to add or rearrange gadgets
- edit the HTML of your Template
- refresh current page or post
- open a new tab with your blog's homepage
- access the blog' settings
- view your stats
- ...and finally, log out

We will put all these options on the top of your page as a menu and we will make it visible only to the administrator of the blog, so our blog visitors will not be able to see it.

The result will be something like this:

admin control panel for blogger

Getting the Blog ID 

The first thing we need to do is get the ID of our blog by clicking on any option from our Blog Dashboard, for example Settings. Once we have clicked there, take a look at the address bar in your browser:

blogger id number

Within the URL you will notice a string like this:
blogID=XXXXXXXXX
Where XXXXXXXXX is the unique identifier (ID) for your blog.

Copy the ID for the blog you wish to work with so we can add this in the links for your admin control panel.

Adding the admin control panel to Blogger template


The Admin Control Panel will only be visible when the blog author is logged in. It is invisible to blog readers, similar to the Edit post/widget pencil icons which are only visible to you while you are logged in.

To add the control panel to your Blogger template, follow the steps below:

Step 1. Go to Template and click on the Edit HTML button:


Step 2. Click anywhere inside the code area and press the CTRL + F keys to open the Blogger' search box

Step 3. Paste this line inside the search box then hit Enter to find it:
<body expr:class='&quot;loading&quot; + data:blog.mobileClass'>
Note: if you can't find this line, try to find the <body> tag.

Step 4. Just below this line, add the following code:
<span class='item-control blog-admin'>
<style>
.control-panel ul{z-index: 20; position: absolute; margin: 0px auto; background-color: #F6F6F6; width: 100%; }
.control-panel ul li{display: inline-block; float: left; padding: 7px 0px;}
.control-panel ul li a {color:#686868;padding: 7px 15px;border-right: 1px solid #E3E3E3;font-weight: bold;font-size: 13px;}
.control-panel a:hover {text-decoration:none; color:#FC8F44;}
</style>
<div class='control-panel'>
<ul>
<li><a href='http://www.blogger.com/home'>My Blogs</a></li>
<li><a href='http://www.blogger.com/blogger.g?blogID=XXXXXXXXXXXXX#editor/src=sidebar'>New Post</a></li>
<li><a href='http://www.blogger.com/blogger.g?blogID=XXXXXXXXXXXXX#editor/target=page'>New Page</a></li>
<li><a href='http://www.blogger.com/blogger.g?blogID=XXXXXXXXXXXXX#posts'>All Posts</a></li>
<li><a href='http://www.blogger.com/blogger.g?blogID=XXXXXXXXXXXXX#comments'>Comments</a></li>
<li><a href='http://www.blogger.com/blogger.g?blogID=XXXXXXXXXXXXX#pageelements'>Layout</a></li>
<li><a href='http://www.blogger.com/blogger.g?blogID=XXXXXXXXXXXXX#templatehtml'>Edit HTML</a></li>
<li><a href='#' onclick='location.reload(true); return false;'>Refresh</a></li>
<li><a href='/' target='_blank'>New Tab</a></li>
<li><a href='http://www.blogger.com/blogger.g?blogID=XXXXXXXXXXXXX#basicsettings'>Settings</a></li>
<li><a href='http://www.blogger.com/blogger.g?blogID=XXXXXXXXXXXXX#overviewstats'>Stats</a></li>
<li><a href='http://www.blogger.com/logout.g'>Logout</a></li>
</ul>
</div>
</span>
Change XXXXXXXXXXXXX with your unique Blog ID previously copied, and be careful not to delete anything, like quote or any other character.

Step 4. Click on the Save template button to save the changes.

Now take a look at your blog. While you are logged in to Blogger, you should notice your control panel appear on top of your blog. Enjoy!

With this admin control panel for Blogger you can easily access the functions of the blog and you will not have to always open your blog page and the Blogger homepage at the same time.

Horizontal menu with sub-tabs in two columns for Blogger

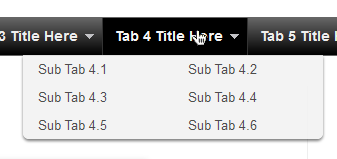
This is a very nice horizontal menu in which its sub-tabs are displayed in two columns and is also made with CSS, without any scripts.
blogger navigation menu, css menu, drop-down menu
The "advantage" so to speak, is that the sub-tabs when arranged in two columns are not very long, so it will be neat and less space along. You can see an example here:


Adding A Horizontal Menu With Sub Tabs in Two Columns To Blogger

STEP 1: In Blogger, go to your "Layout" and on the "Page Elements" section.
  • Click on the "Add a Gadget" link just under your header image
  • From the Gadget's List, select "HTML/JavaScript" option.
STEP 2: Simply copy and paste this ENTIRE code into your widget. Note: Leave the "Title" section of this widget blank.
<div id='menucol'>
<div id='topwrapper'>
<ul id='top'>
<li><a href='http://YOUR URL HERE.com'>Tab 1 Title Here</a></li>
<li><a href='http://YOUR URL HERE.com'>Tab 2 Title Here</a></li>
<li><a class='submenucol' href='#'>Tab 3 Title Here</a>
<ul>
<li><a href='http://YOUR URL HERE.com'>Sub Tab 3.1</a></li>
<li><a href='http://YOUR URL HERE.com'>Sub Tab 3.2</a></li>
<li><a href='http://YOUR URL HERE.com'>Sub Tab 3.3</a></li>
<li><a href='http://YOUR URL HERE.com'>Sub Tab 3.4</a></li>
<li><a href='http://YOUR URL HERE.com'>Sub Tab 3.5</a></li>
<li><a href='http://YOUR URL HERE.com'>Sub Tab 3.6</a></li>
</ul>
</li>
<li><a class='submenucol' href='#'>Tab 4 Title Here</a>
<ul>
<li><a href='http://YOUR URL HERE.com'>Sub Tab 4.1</a></li>
<li><a href='http://YOUR URL HERE.com'>Sub Tab 4.2</a></li>
<li><a href='http://YOUR URL HERE.com'>Sub Tab 4.3</a></li>
<li><a href='http://YOUR URL HERE.com'>Sub Tab 4.4</a></li>
<li><a href='http://YOUR URL HERE.com'>Sub Tab 4.5</a></li>
<li><a href='http://YOUR URL HERE.com'>Sub Tab 4.6</a></li>
</ul>
</li>
<li><a class='submenucol' href='#'>Tab 5 Title Here</a>
<ul>
<li><a href='http://YOUR URL HERE.com'>Sub Tab 5.1</a></li>
<li><a href='http://YOUR URL HERE.com'>Sub Tab 5.2</a></li>
<li><a href='http://YOUR URL HERE.com'>Sub Tab 5.3</a></li>
<li><a href='http://YOUR URL HERE.com'>Sub Tab 5.4</a></li>
<li><a href='http://YOUR URL HERE.com'>Sub Tab 5.5</a></li>
<li><a href='http://YOUR URL HERE.com'>Sub Tab 5.6</a></li>
<li><a href='http://YOUR URL HERE.com'>Sub Tab 5.7</a></li>
<li><a href='http://YOUR URL HERE.com'>Sub Tab 5.8</a></li>
</ul>
</li>
<li><a href='http://YOUR URL HERE.com'>Tab 6 Title Here</a></li>

</ul>
<br class='clearit'/>
</div>
</div>
Customize your main tabs by changing the Tab Titles to whatever you want. Include a URL for each one if you want it to be 'clickable'. If not, you can just put a # sign where it says http://YOUR URL HERE.com

You can add or delete as many of the main tabs as you need, just make sure to copy the entire code for the main tab for each additional tab you want:
<li><a href='http://YOUR URL HERE.com'>Tab 7 Title Here</a>
<ul>
<li><a href='http://YOUR URL HERE.com'>Sub Tab 7.1</a></li>
<li><a href='http://YOUR URL HERE.com'>Sub Tab 7.2</a></li>
<li><a href='http://YOUR URL HERE.com'>Sub Tab 7.3</a></li>
</ul>
</li>
STEP 3: Now let's go a step further and add the CSS style in our Template
  • Go to Template > Edit HTML
  • Click on the sideways arrow next to <b:skin>...</b:skin> 

  • Then click anywhere inside the code area and search - using CTRL + F keys - for the ]]></b:skin> tag and just above ]]></b:skin> add this code:
/* Horizontal menu with 2 columns
----------------------------------------------- */
#menucol {
width:940px;
height:37px;
background-image: -moz-linear-gradient(top, #666666, #000000);
background-image: -webkit-gradient(linear, left top, left bottom, color-stop(0.00, #666666), color-stop(1.0, #000000));
filter: progid:DXImageTransform.Microsoft.Gradient(gradientType=0,startColorStr=#666666,endColorStr=#000000);
border-bottom:1px solid #666666;
border-top:1px solid #666666;
margin:0 auto;padding:0 auto;
overflow:hidden;
}
#topwrapper {
width:940px;
height:40px;
margin:0 auto;
padding:0 auto;
}
.clearit {
clear: both;
height: 0;
line-height: 0.0;
font-size: 0;
}
#top {
width:100%;
}
#top, #top ul {
padding: 0;
margin: 0;
list-style: none;
}
#top a {
border-right:1px solid #333333;
text-align:left;
display: block;
text-decoration: none;
padding:10px 12px 11px;
font:bold 14px Arial;
text-transform:none;
color:#eee;
}
#top a:hover {
background:#000000;
color:#F6F6F6;
}
#top a.submenucol {
background-image: url(https://blogger.googleusercontent.com/img/b/R29vZ2xl/AVvXsEg2xuS58BFTtcy90x-YqgYVc9vWwfE5Yn91erY40cMEqWkvr4rTYLfMif_ajra2IqcHtDPNwmY9tq9icTNaxFrVCwPpbKBeDNZPCnawak8xREW8UI-FmV9IMyAJvay6SxlrsRP4BjGdrPw/s1600/arrow_white.gif);
background-repeat: no-repeat;
padding: 10px 24px 11px 12px;
background-position: right center;
}
#top li {
float: left;
position: relative;
}
#top li {
position: static !important;
width: auto;
}
#top li ul, #top ul li {
width:300px;
}
#top ul li a {
text-align:left;
padding: 6px 15px;
font-size:13px;
font-weight:normal;
text-transform:none;
font-family:Arial, sans-serif;
border:none;
}
#top li ul {
z-index:100;
position: absolute;
display: none;
background-color:#F1F1F1;
margin-left:-80px;
padding:10px 0;
border-radius: 0px 0px 6px 6px;
box-shadow:0 2px 2px rgba(0,0,0,0.6);
filter:alpha(opacity=87);
opacity:.87;
}
#top li ul li {
width:150px;
float:left;
margin:0;
padding:0;
}
#top li:hover ul, #top li.hvr ul {
display: block;
}
#top li:hover ul a, #top li.hvr ul a {
color:#333;
background-color:transparent;
text-decoration:none;
}
#top ul a:hover {
text-decoration:underline!important;
color:#444444 !important;
}
  • Now find (CTRL + F) this line:
/* Tabs
  • It will also have some little lines beneath:
/* Tabs
----------------------------------------------- */
  • And just below these little lines, delete the code below until you reach at:
/* Columns
----------------------------------------------- */
  • Instead of the code that you have removed, add this one:
#crosscol ul {z-index: 200; padding:0 !important;}
#crosscol li:hover {position:relative;}
#crosscol ul li {padding:0 !important;}
.tabs-outer {z-index:1;}
.tabs-inner {padding: 0 0px;}
See this screenshot for more info:
menu for blogger, blogger gadgets, blogger widgets
STEP 4: The final step is to Save the Template and you are done!

Visit your blog to see a beautiful navigation menu just below header.
If you have any questions or need help, leave a comment below.

Create Horizontal Navigation Menu With Drop Down Submenus Using CSS

The following drop down menu is made only with CSS, is a horizontal menu with sub-tabs and the right side has a rounded search. A menu is handy for those who do not require complex menus or prefer not to use one that requires scripts and/or too many images, also the installation and customization is quite simple, and to top it off is quite functional.
To see this drop down menu in action, visit this demo blog

blogger menu, drop down menu, css menu

Prior to doing anything, if you are using a Template made through Blogger Template Designer, then you should consider doing these changes in the template, otherwise the menu might not be displayed correctly:

From your Blogger's Dashboard, go to Template (make a backup < see the screenshot) > Edit HTML:


and search (CTRL + F) for the following line:

<b:section class='tabs' id='crosscol' maxwidgets='1' showaddelement='yes'>

Screenshot

Remove the code in red.
You may have many parts as the one in red, delete all you find.

....then find this section in your template:
/* Tabs
----------------------------------------------- */

...and remove all that is within it, until you reach to the Headings part.

/* Tabs
----------------------------------------------- */
.tabs-outer {
overflow: hidden;
position: relative;
background: $(tabs.background.color) $(tabs.background.gradient) repeat scroll 0 0;
}

#layout .tabs-outer {
overflow: visible;
}

.tabs-cap-top, .tabs-cap-bottom {
position: absolute;
width: 100%;

border-top: 1px solid $(tabs.border.color);

}

.tabs-cap-bottom {
bottom: 0;
}

.tabs-inner .widget li a {
display: inline-block;

margin: 0;
padding: .6em 1.5em;

font: $(tabs.font);
color: $(tabs.text.color);

border-top: 1px solid $(tabs.border.color);
border-bottom: 1px solid $(tabs.border.color);
border-$startSide: 1px solid $(tabs.border.color);
}

.tabs-inner .widget li:last-child a {
border-$endSide: 1px solid $(tabs.border.color);
}

.tabs-inner .widget li.selected a, .tabs-inner .widget li a:hover {
background: $(tabs.selected.background.color) $(tabs.background.gradient) repeat-x scroll 0 -100px;
color: $(tabs.selected.text.color);
}

/* Headings
----------------------------------------------- */

Then add this to where the code has been removed (instead of the code in green):
#crosscol ul {z-index: 200; padding:0 !important;}
#crosscol li:hover {position:relative;}
#crosscol ul li {padding:0 !important;}
.tabs-outer {z-index:1;}
.tabs .widget ul, .tabs .widget ul {overflow: visible;}
Having done this, we can finally add our menu.

How To Add Horizontal Drop Down Menu to Blogger

To put this horizontal menu with submenus in your blog, then follow the next steps:

Step 1. From Template, go to Edit HTML and just above ]]></b:skin> paste these styles:
/* Horizontal drop down menu
----------------------------------------------- */
#menuWrapper {
width:100%; /* Menu width */
height:35px;
padding-left:14px;
background:#333; /* Background color */
border-radius: 10px; 
}
.menu {
padding:0;
margin:0;
list-style:none;
height:35px;
position:relative;
z-index:5;
font-family:arial, verdana, sans-serif;
}
.menu li:hover li a {
background:none;
}
.menu li.top {display:block; float:left;}
.menu li a.top_link {
display:block;
float:left;
height:35px;
line-height:34px;
color:#ccc;
text-decoration:none;
font-family:"Verdana", sans-serif;
font-size:12px; /* Font size */
font-weight:bold;
padding:0 0 0 12px;
cursor:pointer;
}
.menu li a.top_link span {
float:left;
display:block;
padding:0 24px 0 12px;
height:35px;
}
.menu li a.top_link span.down {
float:left;
display:block;
padding:0 24px 0 12px;
height:35px;
}
.menu li a.top_link:hover, .menu li:hover > a.top_link {color:#fff; }
.menu li:hover {position:relative; z-index:2;}
.menu ul,
.menu li:hover ul ul,
.menu li:hover ul li:hover ul ul,
.menu li:hover ul li:hover ul li:hover ul ul,
.menu li:hover ul li:hover ul li:hover ul li:hover ul ul
{position:absolute; left:-9999px; top:-9999px; width:0; height:0; margin:0; padding:0; list-style:none;}

.menu li:hover ul.sub {
left:0;
top:35px;
background:#333; /* Submenu background color */
padding:3px;
white-space:nowrap;
width:200px;
height:auto;
z-index:3;
}
.menu li:hover ul.sub li {
display:block;
height:30px;
position:relative;
float:left;
width:200px;
font-weight:normal;
}
.menu li:hover ul.sub li a{
display:block;
height:30px;
width:200px;
line-height:30px;
text-indent:5px;
color:#ccc;
text-decoration:none;
}
.menu li ul.sub li a.fly {
/* Submenu Background Color */
background:#333 url(https://blogger.googleusercontent.com/img/b/R29vZ2xl/AVvXsEjrIeBWfaUVC6gqOgo8hNj2J5n0ZbBJI0pPOeh8NBScIVP6mRMezd1j8B3IpxqK2ksj316mGz1MwMoQ5_O6eBHgienXKR5UpXGiCsmL-YG4s4OCF3gkKGajPSPOMBMbJGqg6Vduxr1Eqno/s1600/arrow_over.gif) 185px 10px no-repeat;}
.menu li:hover ul.sub li a:hover {
background:#515151; /* Background Color on mouseover */
color:#fff;
}
.menu li:hover ul.sub li a.fly:hover, .menu li:hover ul li:hover > a.fly {
/* Background on Mouseover */
background:#646464 url(https://blogger.googleusercontent.com/img/b/R29vZ2xl/AVvXsEjrIeBWfaUVC6gqOgo8hNj2J5n0ZbBJI0pPOeh8NBScIVP6mRMezd1j8B3IpxqK2ksj316mGz1MwMoQ5_O6eBHgienXKR5UpXGiCsmL-YG4s4OCF3gkKGajPSPOMBMbJGqg6Vduxr1Eqno/s1600/arrow_over.gif) 185px 10px no-repeat; color:#fff;}

.menu li:hover ul li:hover ul,
.menu li:hover ul li:hover ul li:hover ul,
.menu li:hover ul li:hover ul li:hover ul li:hover ul,
.menu li:hover ul li:hover ul li:hover ul li:hover ul li:hover ul {
left:200px;
top:-4px;
background: #333; /* Background Color of the Submenu */
padding:3px;
white-space:nowrap;
width:200px;
z-index:4;
height:auto;
}
#search {
width: 228px; /* Width of the Search Box */
height: 50px;
float: right;
z-index: 2;
text-align: center;
margin-top: 5px;
margin-right: 6px;
/* Background of the Search Box */
background: url(https://blogger.googleusercontent.com/img/b/R29vZ2xl/AVvXsEgCWvbBYmxJGDBjU4UiyQUHNuYuAljse8e-mz4zGtYwc96IhhEpglwy8Fv_HGoQxR08JLOU0NC-muvxO4P0AX3hRkH3u6tYb5tWIgtVT51PN0bQmD7VziFLIhC_AVfGz9WsB61aDfR4USc/s1600/searchBar1.png) no-repeat;
}
#search-box {
margin-top: 3px;
border:0px;
background: transparent;
text-align:center;
}


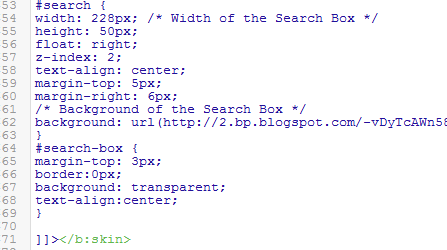
Screenshot
Step 2. Save the Template


Step 3. Go to Layout > click on Add a Gadget link


Step 4. Choose HTML/Javascript and paste the following inside the empty box:

<div id='menuWrapper'>
<ul class='menu'>
<li class='top'><a class='top_link' href='Link URL'><span>Title 1</span></a></li>

<li class='top'><a class='top_link' href='Link URL'><span class='down'>Title 2</span></a><ul class='sub'><li><a class='fly' href='Link URL'>Submenu 2.1</a><ul>
<li><a href='Link URL'>Submenu 2.1.1</a></li>
<li><a href='Link URL'>Submenu 2.1.2</a></li>
<li><a href='Link URL'>Submenu 2.1.3</a></li>
</ul>
</li>
<li class='mid'><a class='fly' href='Link URL'>Submenu 2.2</a>
<ul>
<li><a href='Link URL'>Submenu 2.2.1</a></li>
<li><a href='Link URL'>Submenu 2.2.2</a></li>
<li><a href='Link URL'>Submenu 2.2.3</a></li>
<li><a class='fly' href='Link URL'>Submenu 2.2.4</a>
<ul>
<li><a href='Link URL'>Submenu 2.2.4.1</a></li>
<li><a href='Link URL'>Submenu 2.2.4.2</a></li>
<li><a href='Link URL'>Submenu 2.2.4.3</a></li>
</ul>
</li>
<li><a href='Link URL'>Submenu 2.2.5</a></li>
<li><a class='fly' href='Link URL'>Submenu 2.2.6</a>
<ul>
<li><a href='Link URL'>Submenu 2.2.6.1</a></li>
<li><a href='Link URL'>Submenu 2.2.6.2</a></li>
</ul>
</li>
</ul>
</li>
<li><a href='Link URL'>Submenu 2.3</a></li>
<li><a href='Link URL'>Submenu 2.4</a></li>
<li><a href='Link URL'>Submenu 2.5</a></li>
</ul>
</li>

<li class='top'><a class='top_link' href='Link URL'><span class='down'>Title 3</span></a>
<ul class='sub'>
<li><a href='Link URL'>Submenu 3.1</a></li>
<li><a href='Link URL'>Submenu 3.2</a></li>
<li><a href='Link URL'>Submenu 3.3</a></li>
<li><a href='Link URL'>Submenu 3.4</a></li>
</ul>
</li>

<li class='top'><a class='top_link' href='Link URL'><span class='down'>Title 4</span></a>
<ul class='sub'>
<li><a href='Link URL'>Submenu 4.1</a></li>
<li><a class='fly' href='Link URL'>Submenu 4.2</a>
<ul>
<li><a href='Link URL'>Submenu 4.2.1</a></li>
<li><a href='Link URL'>Submenu 4.2.2</a></li>
<li><a href='Link URL'>Submenu 4.2.3</a></li>
<li><a href='Link URL'>Submenu 4.2.4</a></li>
<li><a href='Link URL'>Submenu 4.2.5</a></li>
<li><a href='Link URL'>Submenu 4.2.6</a></li>
</ul>
</li>
<li><a href='Link URL'>Submenu 4.3</a></li>
<li><a href='Link URL'>Submenu 4.4</a></li>
<li><a href='Link URL'>Submenu 4.5</a></li>
<li><a href='Link URL'>Submenu 4.6</a></li>
</ul>
</li>

<li class='top'><a class='top_link' href='Link URL'><span class='down'>Title 5</span></a>
<ul class='sub'>
<li><a href='Link URL'>Submenu 5.1</a></li>
<li><a href='Link URL'>Submenu 5.2</a></li>
<li><a href='Link URL'>Submenu 5.3</a></li>
</ul>
</li>


<!-- Search Bar -->
<li>
<form action='/search' id='search' method='get' name='searchForm' style='display:inline;'>
<input id='search-box' name='q' onblur='if (this.value == &quot;&quot;) this.value = &quot;Search here...&quot;;' onfocus='if (this.value == &quot;Search here...&quot;) this.value = &quot;&quot;;' size='28' type='text' value='Search here...'/></form>
</li>

</ul>
</div>

Customization:

- replace the text in blue and red with your links and titles.
- if you need more tabs, then add a line like this just above <!-- Search Bar -->

<li class="top"><a href="Link URL" class="top_link"><span>Title</span></a></li>

- if you want to add a tab with sub-tabs, then add this code:

<li class="top"><a href="Link URL" class="top_link"><span class="down">Title</span></a>
<ul class="sub">
<li><a href="Link URL">Submenu Title</a></li>
</ul>
</li>

- and if you want one of the other sub-tabs have sub-tabs then remove a line like the one in orange and change it to a code like this:

<li><a href="Link URL" class="fly">Submenu Title</a>
<ul>
<li><a href="Link URL">Other Submenu</a></li>
</ul>
</li>

And that's it! Now Save your Widget and enjoy your new drop down menu! ;)