Tampilkan postingan dengan label recent posts. Tampilkan semua postingan

5 Cool Recent Post Widgets for Blogger

For bloggers that pride themselves on always staying up-to-date with new content, a recent post widget for Blogger can be an invaluable tool. A recent post widget for blogger is in many ways similar to a 'breaking news alert' that journalists love to use during their reports, providing the most recent and relevant posts that you have to offer.

Adding a recent post widget for Blogger helps to reduce the dependency on email marketing, because you don't have to send out an email just to let people know you made a new post. Instead, it updates automatically for everyone to see. You can then use this information to design scheduled email newsletters, and take advantage of what's often referred to as the 'Twitter effect' where audiences will regularly check back on your site for the possibility that new posts are available. Without this, you force people to do run their own search for information and content, increasing the likelihood that they'll leave the site and hurt your bounce rate.

Once you've managed to attract visitors to one of your posts using the recent post widget for Blogger, it will continue to act as an accessible secondary resource to navigate around your site. That way, you can avoid having them sifting through old content that might be outdated. If you'd rather show off some of your best posts instead of your most recent posts, you can do that instead, or add that feature to the bar with just a few alterations.

Apart from looking great and taking up minimal space, there are too many benefits for you not to have a recent post widget for Blogger. The best part about these add-ons is that they come in a wide variety of designs that will fit any theme. If you're interested in adding a widget to your site, here are 5 cool recent post widgets that might catch your eye and fit perfectly with your Blogger template:
recent posts for blogger, cool widgets

Style #1

rainbow widget, recent posts
<script style="text/javascript" src="http://helplogger.googlecode.com/svn/trunk/helplogger/recentpoststhumbs.js"></script>
<script style="text/javascript">
var posts_no = 5;
var showpoststhumbs = true;
var readmorelink = true;
var showcommentslink = false;
var posts_date = true;
var post_summary = true;
var summary_chars = 70;
</script>
<script src="/feeds/posts/default?orderby=published&alt=json-in-script&callback=showlatestpostswiththumbs"></script>
<a style="font-size: 9px; color: #CECECE; float: right; margin: 5px;" href="http://helplogger.blogspot.com/2014/11/5-cool-recent-post-widgets-for-blogger.html" rel="nofollow">Recent Posts Widget</a>
<noscript>Your browser does not support JavaScript!</noscript>
<link href='http://fonts.googleapis.com/css?family=Ubuntu+Condensed' rel='stylesheet' type='text/css' />
<style type="text/css">
img.recent-post-thumb {width:50px;height:50px;float:right;margin: 5px -5px 0px 0px; border-radius: 100%; padding: 3px;background: #fff}
.recent-posts-container {font-family: 'Ubuntu Condensed', sans-serif; float: left;width: 100%;min-height: 55px;margin: 5px 0px 5px 0px;padding: 0;font-size:12px;}
ul.recent-posts-container {list-style-type: none; background: #fff;padding: 0px; }
ul.recent-posts-container li:nth-child(1n+0) {background: #F49A9A; width: 100%}
ul.recent-posts-container li:nth-child(2n+0) {background: #FCD092; width: 95%}
ul.recent-posts-container li:nth-child(3n+0) {background: #FFF59E; width: 90%;}
ul.recent-posts-container li:nth-child(4n+0) {background: #E1EFA0; width: 85%;}
ul.recent-posts-container li:nth-child(5n+0) {background: #B1DAEF; width: 80%;}
ul.recent-posts-container li {padding:5px 10px;min-height:50px; list-style-type: none; margin: 0px 5px -5px 5px; color: #777;}
.recent-posts-container a { text-decoration:none; }
.recent-posts-container a:hover { color: #222;}
.post-date {color:#e0c0c6; font-size: 11px; }
.recent-post-title a {font-size: 14px;color: #444; font-weight: bold;}
.recent-post-title {padding: 6px 0px;}
.recent-posts-details a{ color: #222;}
.recent-posts-details {padding: 5px 0px 5px; }
</style>

Style #2

recent posts widget
<div class="recentpoststyle">
<script src="http://helplogger.googlecode.com/svn/trunk/helplogger/recentposts.js"></script>
<script>
var posts_no = 5;var posts_date = true;var post_summary = true;var summary_chars = 80;</script>
<script src="/feeds/posts/default?orderby=published&amp;alt=json-in-script&amp;callback=showlatestposts">
</script><a style="font-size: 9px; color: #CECECE; float: right; margin: 5px;" href="http://helplogger.blogspot.com/2014/11/5-cool-recent-post-widgets-for-blogger.html" rel="nofollow">Recent Posts Widget</a>
<noscript>Your browser does not support JavaScript!</noscript>
<style type="text/css">
.recentpoststyle {counter-reset: countposts;list-style-type: none;}
.recentpoststyle a {text-decoration: none; color: #49A8D1;}
.recentpoststyle a:hover {color: #000;}
.recentpoststyle li:before {content: counter(countposts,decimal);counter-increment: countposts;float: left;z-index: 2;position:relative;font-size: 20px;font-weight: bold;color: #fff;background: #69B7E2; margin: 15px 5px 0px -6px; padding: 0px 10px; border-radius: 100%;}
li.recent-post-title { padding: 5px 0px;}
.recent-post-title { font-family: "Avant Garde",Avantgarde,"Century Gothic",CenturyGothic,AppleGothic,sans-serif;}
.recent-post-title a {color: #444;font-size: 13px; text-decoration: none; padding: 2px; font-weight: bold;}
.post-date {padding: 5px 2px 5px 30px; font-size: 11px; color: #999; margin-bottom: 5px;}
.recent-post-summ { border-left: 1px solid #69B7E2; color: #777; padding: 0px 5px 0px 20px; margin-left: 11px; font-family: Garamond,Baskerville,"Baskerville Old Face","Hoefler Text","Times New Roman",serif; font-size: 15px;}
</style></div>

Style #3

recent posts gadget

<script style="text/javascript" src="http://helplogger.googlecode.com/svn/trunk/helplogger/recentpoststhumbs.js"></script>
<script style="text/javascript">
var posts_no = 5;
var showpoststhumbs = true;
var readmorelink = true;
var showcommentslink = true;
var posts_date = true;
var post_summary = true;
var summary_chars = 70;</script>
<script src="/feeds/posts/default?orderby=published&alt=json-in-script&callback=showlatestpostswiththumbs"></script>
<a style="font-size: 9px; color: #CECECE; float: right; margin: 5px;" href="http://helplogger.blogspot.com" rel="nofollow">Recent Posts Widget</a>
<noscript>Your browser does not support JavaScript!</noscript>
<link href='http://fonts.googleapis.com/css?family=Oswald' rel='stylesheet' type='text/css'/>
<style type="text/css">
img.recent-post-thumb {padding:2px;width:65px;height:65px;float:left;margin: 0px 10px 10px; background: #fff; border: 1px solid #69B7E2;}
.recent-posts-container {font-family: 'Oswald', sans-serif;  float: left;width: 100%;min-height: 70px;margin: 5px 0px 5px 0px;padding: 0;font-size:12px;}
ul.recent-posts-container li {padding:5px 0px;min-height:65px; list-style-type: none; margin-bottom: 5px;}
ul.recent-posts-container {counter-reset: countposts;list-style-type: none;}
ul.recent-posts-container li:before {content: counter(countposts,decimal);counter-increment: countposts;z-index: 2;position:absolute; left: 15px; font-size: 13px;font-weight: bold;color: #fff;background: #69B7E2;padding: 4px 10px; border-radius: 100%;}
.recent-posts-container a { text-decoration:none; }
.recent-post-title a {font-size: 13px; text-transform: uppercase; color: #2aace3;}
.recent-posts-details {margin: 5px 0px 0px 92px; }
.recent-posts-details a{ color: #777;}
</style>

Style #4

recent posts for blogger, cool widgets
<script style="text/javascript" src="http://helplogger.googlecode.com/svn/trunk/helplogger/recentposts2.js"></script>
<script style="text/javascript">
var posts_no = 5;
var showpoststhumbs = false;
var readmorelink = true;
var showcommentslink = true;
var posts_date = true;
</script>
<script src="/feeds/posts/default?orderby=published&alt=json-in-script&callback=showlatestpostswiththumbs"></script>
<a style="font-size: 9px; color: #CECECE; float: right; margin: 5px;" href="http://helplogger.blogspot.com">Recent Posts Widget</a>
<noscript>Your browser does not support JavaScript!</noscript>
<link href='http://fonts.googleapis.com/css?family=Oswald' rel='stylesheet' type='text/css'/>
<style type="text/css">
img.recent-post-thumb {padding: 2px; width:35px;height:35px;float:right;margin: -14px 0px 0px 5px; border: 1px solid #cea5ac; border-radius: 10%;}
.recent-posts-container {font-family: 'Oswald', sans-serif;  float: left;width: 100%;min-height: 70px;margin: 5px 0px 5px 0px;padding: 0;font-size:12px;}
ul.recent-posts-container li {padding:5px 0px;min-height:65px; list-style-type: none; margin: 0px 10px 5px 35px;}
ul.recent-posts-container {counter-reset: countposts;list-style-type: none;}
ul.recent-posts-container li:before {content: counter(countposts,decimal);counter-increment: countposts;z-index: 2;position:absolute; left: 5px; font-size: 16px;color: #4D4D4D;background: #F7F7F7;padding: 9px 14px; border: 1px solid #efefef;}
.recent-posts-container a { text-decoration:none; }
.recent-posts-container a:hover{color: #4DACE3;}
.post-date {color:#e0c0c6; font-size: 11px; }
.recent-post-title a {font-size: 13px; text-transform: uppercase; color: #5C4D4D;}
.recent-post-title { margin: 5px 0px; }
.recent-posts-details {border-top: 4px solid #AC707A; margin-top: 5px; padding-top: 5px;}
.recent-posts-details a{ color: #888;}
a.readmorelink {color: #4DACE3;}
</style>

Style #5

recent posts, blogger gadget
<script style="text/javascript" src="https://helplogger.googlecode.com/svn/trunk/helplogger/recentposts2.js"></script>
<script style="text/javascript">
var posts_no = 5;
var showpoststhumbs = true;
var readmorelink = true;
var showcommentslink = true;
var posts_date = true;
</script>
<script src="/feeds/posts/default?orderby=published&alt=json-in-script&callback=showlatestpostswiththumbs" rel="nofollow"></script>
<a style="font-size: 9px; color: #CECECE; float: right; margin: 5px;" href="http://helplogger.blogspot.com/2014/11/5-cool-recent-post-widgets-for-blogger.html" rel="nofollow">Recent Posts Widget</a>
<noscript>Your browser does not support JavaScript!</noscript>
<link href='http://fonts.googleapis.com/css?family=Lobster|Gloria+Hallelujah' rel='stylesheet' type='text/css' />
<style type="text/css">
img.recent-post-thumb {width:50px;height:50px;float:right;margin: -4px -35px 0px 0px; border: 4px solid #FCD6CB; border-radius: 100%;}
.recent-posts-container {font-family: 'Gloria Hallelujah', cursive;  float: left;width: 100%;min-height: 55px;margin: 5px 0px 5px 0px;padding: 0;font-size:12px;}
ul.recent-posts-container {counter-reset: countposts;list-style-type: none; background: #fff; }
ul.recent-posts-container li:before {content: counter(countposts,decimal);counter-increment: countposts;z-index: 2;position:absolute; left: -20px; font-size: 16px;color: #616662;background: #FCD6CB;padding: 9px 14px; border-radius: 100%; margin-top: 15px;}
ul.recent-posts-container li {padding:5px 0px;min-height:50px; list-style-type: none; margin: -2px 5px 5px 5px;  border-top: 2px solid #FCD6CB;}
ul.recent-posts-container {border: 2px solid #FCD6CB; }
.recent-posts-container a { text-decoration:none; }
.recent-posts-container a:hover { color: #222;}
.post-date {color:#e0c0c6; font-size: 11px; }
.recent-post-title a {font-size: 14px;color: #616662;}
.recent-post-title {padding: 6px 0px;}
.recent-posts-details a{ color: #888;}
.recent-posts-details {padding-bottom: 5px;}
a.readmorelink {color: #4DACE3;}
</style>

How to Add Recent Posts Widget on Blogger

Want to add one of the styles above? Just follow the following steps below:

Step 1. Log in to your Blogger dashboard and click on your blog
Step 2. Go to "Layout" and click the "Add a gadget" link on the right side
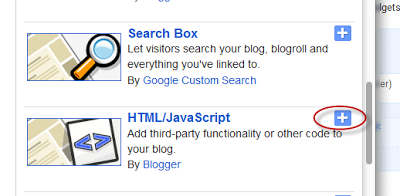
Step 3. From the pop-up window, scroll down and select the "HTML/JavaScript" gadget:


Step 4. Paste the code of the chosen widget found below it.
Step 5. Hit the "Save" button... and that's it!

Keep Your Blog Updated

Using a recent post widget for Blogger can truly benefit you and improve your skill as a blogger. As you can see, these designs can look great on Blogger sites, but they do act a little bit like a progress report for the author. If you start to fall behind, the dates on your recent post widget will definitely give you away.

Set a schedule and make sure that you are making regular posts on the blog. These posts will be automatically updated on your widget and readers can view this information whenever they want. Add your recent post widget for Blogger on the every page of the blog or in your template so that these posts can encourage others to continue reading, thus increasing the total time spent on your site.

Recent Rotating Post Gadget with Excerpt For Blogger

This Javascript code will display the latest posts of any feed with the distinction of having two parts that can be used individually or combined. At the top this widget will show a single post along with the title (link), author, date and a brief summary of its content. In addition, this post will rotate automatically within a list whose number of elements will be decided by us. At the bottom, we'll find a full list with chosen posts that will change the post above when we mouse over them, thus breaking the automatic cycle.
recent posts widget for blogger
Before installing anything, let's see it in action to decide if it does what we want.


Loading...

How to Add Recent Rotating Posts Widget to Blogger


Step 1. Go to Layout > click on Add a Gadget link.


Step 2. From the pop-up windows, choose the HTML/Javascript gadget


Step 3. Paste this code inside the empty box:
<style>
.gfg-root {
width: 100%;
height : auto;
position : relative;
overflow : hidden;
margin: 0 auto;
text-align : center;
font-size: 12px;
border: 1px solid #DBDBDB;
}
.gfg-title {
font-size: 16px;
font-weight : bold;
color : #6B6B6B;
background:#F3F3F3;
background-repeat: repeat;
line-height : 1.4em;
overflow : hidden;
white-space : nowrap;
padding: 5px;
text-shadow: 0px 2px #fff;
}
.gfg-entry {
background-color: #FFFFFF;
width : 100%;
height : 9.2em;
position : relative;
overflow : hidden;
text-align : left;
margin-top : 3px;
}
.gf-title a {
text-transform: capitalize;
color: #0000ff;
font-size: 14px;
}
.gfg-subtitle {
display: none;
}
.gfg-list {
position : relative;
overflow : hidden;
text-align : left;
}
.gfg-listentry {
line-height : 1.5em;
overflow : hidden;
white-space : nowrap;
text-overflow : ellipsis;
padding-left : 15px;
padding-right : 5px;
}
.gfg-listentry-odd {
background-color : #F3F3F3;
border-bottom : 1px dotted #CCCCCC;
padding: 5px;
}
.gfg-listentry-even {
background-color : #F3F3F3;
border-bottom : 1px dotted #CCCCCC;
padding: 5px;
}
.gfg-listentry-odd a{
color: #595959;
padding: 0 0px 0 10px;
}
.gfg-listentry-even a{
color: #242424;
padding: 0 0px 0 10px;
}
.gfg-listentry-highlight {
background: #FFFFFF;
}
.gfg-listentry-highlight:before {
position: absolute;
left: 0;
content: '\25BA ';
font-size: 14px;
color: #DBDBDB;
}
.gfg-listentry-highlight a {
color: #242424;
}
.gfg-root .gfg-entry .gf-result {
position : relative;
background-color: #ffffff;
width : auto;
height : 100%;
padding-left : 20px;
padding-right : 5px;
}
.gfg-root .gfg-entry .gf-result .gf-title {
font-size: 14px;
line-height : 1.2em;
overflow : hidden;
white-space : nowrap;
text-overflow : ellipsis;
margin-bottom : 2px;
margin-top: 5px;
}
.gfg-root .gfg-entry .gf-result .gf-snippet {
height : 3.8em;
color: #000000;
margin-top : 3px;
}
.clearFloat {
clear : both;}</style>
<script src="http://www.google.com/jsapi" type="text/javascript"></script><script src="http://www.google.com/uds/solutions/dynamicfeed/gfdynamicfeedcontrol.js" type="text/javascript"></script>
<script type="text/javascript">
function showGadget() {var feeds = [{title:'List',url:'http://helplogger.blogspot.com/feeds/posts/default?redirect=false&start-index=1&max-results=10'},];
new GFdynamicFeedControl(feeds, 'feedGadget',{title: 'Latest Posts', numResults : 10, displayTime : 5000, hoverTime : 500});} google.load("feeds", "1");
google.setOnLoadCallback(showGadget);
</script>
<div id="feedGadget">Loading...</div>

Customizations:

The url in blue is the feed address. Obviously, the http://helplogger.blogspot.com address should be replaced with yours.

Next is start-index=1. This number indicates which post will appear first on the list. By default it is the latest post published on our blog, so if we want to begin displaying older posts, we need to change the 1 value.

max-results=10 indicates the maximum number of posts that we will be reading from the feed, beginning from the one that we have set up before in the start-index=1. This number always needs to be equal or greater to what we should see later and its purpose is to set the number of posts that will be shown in the gadget. The easy thing would be to put 500 in order not to fail, but the higher the number is, the longer the gadget will take to load, so it's better to adjust to what we need to show.

Finally here are some other parameters of the script:

title: 'Latest Posts', is the widget's title that appears on top.
numResults: 10, number of posts that will show in the list
displayTime: 5000, the delay time between posts in the rotator (in milliseconds)
hoverTime: 500, minimum time for an item in the list to be displayed at the top.

If you want to hide the list and show only the posts, then change this part:
.gfg-list {
position : relative;
overflow : hidden;
text-align : left;
}
 to :
.gfg-list {
display:none;
}
and if you want to display only the list, then change this part:
.gfg-entry {
background-color: #FFFFFF;
width : 100%;
height : 9.2em;
position : relative;
overflow : hidden;
text-align : left;
margin-top : 3px;
}
to:
.gfg-entry {
display: none; }

Step 4. Save the gadget and you're done. Enjoy!

Show Recent Posts With Thumbnails For Particular Label or Category in Blogger

Sometimes we want to have everything organized, so that our readers can find topics of interest more easily. To accomplish this, instead of putting a widget with the latest posts, we can put together the latest entries sorted by category, so that we'll be able to show the latest posts for each label we want and also display a thumbnail for our category.

recent posts by labels

To add this recent posts widget for labels or categories in a Blogger blog, follow the next steps:

Recent Posts with Thumbnails Sorted by Labels

Step 1. From your Blogger Dashboard, go to 'Template' and click the 'Edit HTML' button


Step 2. Click anywhere inside the code area and search (CTRL + F) for this piece of code:
]]></b:skin>

Just above ]]></b:skin>, paste this CSS style:
/* Recent posts by labels
--------------------------------- */
img.label_thumb{
float:left;
margin-right:10px !important;
height:65px; /* Thumbnail height */
width:65px; /* Thumbnail width */
border: 1px solid #fff;
-webkit-border-radius: 10px;
-moz-border-radius: 10px;
border-radius: 10px;
-webkit-box-shadow: 0 1px 1px rgba(0, 0, 0, .4);
-moz-box-shadow: 0 1px 1px rgba(0, 0, 0, .4);
box-shadow: 0 1px 1px rgba(0, 0, 0, .4);
}

#label_with_thumbs {
float: left;
width: 100%;
min-height: 70px;
margin: 0px 10px 2px 0px;
padding: 0;
}
ul#label_with_thumbs li {
padding:8px 0;
min-height:65px;
margin-bottom:0px;
border-bottom: 1px dotted #999999;
}

#label_with_thumbs li{
list-style: none ;
padding-left:0px !important;
}

#label_with_thumbs a { text-transform: uppercase;}
#label_with_thumbs strong {padding-left:0px; }
Step 3. Now try to find this tag:
</head>
... just above </head> add this script:
<script type='text/javascript'>
//<![CDATA[
function labelthumbs(json){document.write('<ul id="label_with_thumbs">');for(var i=0;i<numposts;i++){var entry=json.feed.entry[i];var posttitle=entry.title.$t;var posturl;if(i==json.feed.entry.length)break;for(var k=0;k<entry.link.length;k++){if(entry.link[k].rel=='replies'&&entry.link[k].type=='text/html'){var commenttext=entry.link[k].title;var commenturl=entry.link[k].href;}
if(entry.link[k].rel=='alternate'){posturl=entry.link[k].href;break;}}var thumburl;try{thumburl=entry.media$thumbnail.url;}catch(error)
{s=entry.content.$t;a=s.indexOf("<img");b=s.indexOf("src=\"",a);c=s.indexOf("\"",b+5);d=s.substr(b+5,c-b-5);if((a!=-1)&&(b!=-1)&&(c!=-1)&&(d!="")){thumburl=d;}else thumburl='https://blogger.googleusercontent.com/img/b/R29vZ2xl/AVvXsEhpB9pqz8AAuBxPAR3m20fNVIF7Y_xoqsYbBKj3hs3L3OAoZn5q2ruDkzfOdysywzog2W9EM-sBLj9BFJ6O2G_2P0WyNsVuXLO8tFdNzWlr3UIfyDS_V4Ak_n8wgRKdp-6xnPCjt2nTgk8/s1600/picture_not_available.png';}
var postdate=entry.published.$t;var cdyear=postdate.substring(0,4);var cdmonth=postdate.substring(5,7);var cdday=postdate.substring(8,10);var monthnames=new Array();monthnames[1]="Jan";monthnames[2]="Feb";monthnames[3]="Mar";monthnames[4]="Apr";monthnames[5]="May";monthnames[6]="June";monthnames[7]="July";monthnames[8]="Aug";monthnames[9]="Sept";monthnames[10]="Oct";monthnames[11]="Nov";monthnames[12]="Dec";document.write('<li class="clearfix">');if(showpostthumbnails==true)
document.write('<a href="'+posturl+'" target ="_top"><img class="label_thumb" src="'+thumburl+'"/></a>');document.write('<strong><a href="'+posturl+'" target ="_top">'+posttitle+'</a></strong><br>');if("content"in entry){var postcontent=entry.content.$t;}
else
if("summary"in entry){var postcontent=entry.summary.$t;}
else var postcontent="";var re=/<\S[^>]*>/g;postcontent=postcontent.replace(re,"");if(showpostsummary==true){if(postcontent.length<numchars){document.write('');document.write(postcontent);document.write('');}
else{document.write('');postcontent=postcontent.substring(0,numchars);var quoteEnd=postcontent.lastIndexOf(" ");postcontent=postcontent.substring(0,quoteEnd);document.write(postcontent+'...');document.write('');}}
var towrite='';var flag=0;document.write('<br>');if(showpostdate==true){towrite=towrite+monthnames[parseInt(cdmonth,10)]+'-'+cdday+' - '+cdyear;flag=1;}
if(showcommentnum==true)
{if(flag==1){towrite=towrite+' | ';}
if(commenttext=='1 Comments')commenttext='1 Comment';if(commenttext=='0 Comments')commenttext='No Comments';commenttext='<a href="'+commenturl+'" target ="_top">'+commenttext+'</a>';towrite=towrite+commenttext;flag=1;;}
if(displaymore==true)
{if(flag==1)towrite=towrite+' | ';towrite=towrite+'<a href="'+posturl+'" class="url" target ="_top">More »</a>';flag=1;;}
document.write(towrite);document.write('</li>');if(displayseparator==true)
if(i!=(numposts-1))
document.write('');}document.write('</ul>');}
//]]>
</script>
Note: to add your own pic for the posts with no thumbnail, replace the image url in blue with your own

Update! For a better image resolution add this script above the </body> tag:
<script type='text/javascript'>                  
function changeThumbSize(id,size){
var blogGadget = document.getElementById(id);
var replacement = blogGadget.innerHTML;
blogGadget.innerHTML = replacement.replace(/s72-c/g,"s"+size+"-c");
var thumbnails = blogGadget.getElementsByTagName("img");
for(var i=0;i&lt;thumbnails.length;i++){
thumbnails[i].width = size;
thumbnails[i].height = size;
}
}
changeThumbSize("label_with_thumbs",210);             
</script>
Now Save the template to finish with your changes.

So, what we have added, is the CSS to style the widget and the script to make it work. Now all we have to do is to add the widget's code to the blog sidebar in a HTML/JavaScript gadget:

Step 4. Go to Layout - click on Add a Gadget

blogger layout, add a gadget

Step 5. From the pop-up window, choose the HTML/Javascript widget and paste this script inside the empty box:
<script type='text/javascript'>var numposts = 3;var showpostthumbnails = true;var displaymore = false;var displayseparator = true;var showcommentnum = false;var showpostdate = false;var showpostsummary = true;var numchars = 100;</script>
<script type="text/javascript" src="/feeds/posts/default/-/Name-of-the-label?published&alt=json-in-script&callback=labelthumbs"></script>

Note: Where it says Name-of-the-label should be the name of the label that you want to display, and if your label is case sensitive, like in my example, then you should type it that way.

Within the last code, there are these parts which can be customized - change true with false or vice versa:
var numposts ← Number of posts to display
var showpostthumbnails ← Show/hide thumbnails
var displaymore ← Show or hide the read more link
var displayseparator ← Show/hide separator
var showcommentnum ← Show/hide the number of comments
var showpostdate ← Show/hide the posts dates
var showpostsummary ← Show or not the posts summaries
var numchars ← Number of posts characters (here you have to change the 100 value)
Remember that the gadget displays the latest posts from a particular label... therefore, if you want to display the latest posts from other labels, repeat step 5 for each additional category that you want to add.

That's it :) Enjoy!

Recent Posts Widget with Thumbnails for Blogger/Blogspot

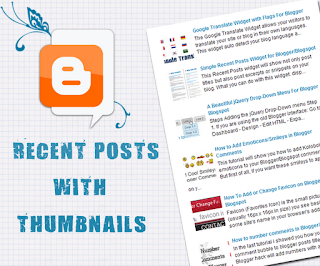
A few days ago, I posted a tutorial on How to Add a Simple Recent Posts Widget that shows a list with the most recent posts if you would prefer a more minimalist look. In this post, you will see a different way of displaying the Recent Posts on Blogger - this is specially for those who want to show more info like the recent posts excerpt / summary and the posts thumbnails.

To add this gadget is very easy, just follow these steps below:

recent posts, blogger widgets

How to Add the Recent Posts Widget to Blogger

Step 1. From your Blogger Dashboard, go to Layout > click on Add a Gadget link


Step 2. From the pop-up window, scroll down and choose HTML/JavaScript


Step 3. Inside the empty box, add the following code:
<div class="eggTray">
<script src="http://helplogger.googlecode.com/svn/trunk/listbadge.js">{"pipe_id":"1a6640e2a78b2c6e736f2220529daae5","_btype":"list",
"pipe_params":{"URL":"YOUR-BLOG/feeds/posts/default"},
"hideHeader":"false","height":"500","count": 8 }</script>
<noscript>Your browser does not support JavaScript!</noscript></div>
<style type=text/css>
.eggTray {margin:10px 0px;padding:0px;}
.ybr li  {border-bottom:0px #cccccc dotted; padding:0px 0px 10px 0px!important;}
.pipesTitle {padding-top:0px;}
.pipesDescription {display:true;}
.ycdr, .ycdr a {color:#999999;}
.widget .popular-posts ul {padding-left:0;}
</style>
Note: 
- Replace YOUR-BLOG with the url of your site/blog (ex: http://helplogger.blogspot.com) and pay attention to have no forward slash symbol "/" at the end of the url
- To disable the scroll bar, remove the number 500
- By default, this widget is set to display a maximum of 8 recent posts. To change this number, replace the number 8 with the number of posts that you want to appear
- if you want only the posts titles, change true to none and "0" from padding-top:0px with 10

Step 4. Save your widget. And you're done!

Simple Recent Posts Widget for Blogger/Blogspot

The main advantage on this Recent Posts widget is that it will show not only post titles, but also post excerpts or snippets, and it's easy to customize or apply different style on it. To make it fit your own design, you will need to modify the CSS style - you can change the link or background color, the size and color of text/links.

What you can do with this widget:
- display post titles only
- change the number of posts
- change the number of characters of the post snippet/excerpt
- show the post dates

See the screenshot below:

How to add Recent Posts Widget to Blogger

Step 1. Log in to your Blogger Dashboard > go to "Layout" and click the "Add a Gadget" link


Step 2. From the pop-up window, scroll down and choose HTML/JavaScript


Step 3. Select & Copy the code from one of the options below and paste it into the new HTML/JavaScript:

Option 1: Recent Posts Widget with Snippets

<div id="hlrpsa">
<script src="http://helplogger.googlecode.com/svn/trunk/recent-posts-with-snippets.js">
</script>
<script>
var numposts = 5;var showpostdate = false;var showpostsummary = true;var numchars = 100;var standardstyling = true;
</script>
<script src="http://blog-address.com/feeds/posts/default?orderby=published&amp;alt=json-in-script&amp;callback=showrecentposts">
</script></div><a style="font-size: 9px; color: #CECECE; float: right; margin: 5px;" href="http://helplogger.blogspot.com/2012/04/simple-related-posts-widget-for-blogger.html" rel="nofollow" >Recent Posts Widget</a>
<noscript>Your browser does not support JavaScript!</noscript>
<style type="text/css">
#hlrpsa a {color: #0B3861; font-size: 13px;}
#rpdr, #rpdr a {color:#808080;}
#hlrpsa { color: #999999; font-size: 11px; border-bottom:1px #cccccc dotted; margin-top:-10px; padding-bottom:10px;}
.hlrps a {font-weight:bold; }
.hlrpssumm {}
</style>

Option 2: Recent Posts Widget Showing Post Titles Only

<div id="hlrpsb">
<script style="text/javascript" src="http://helplogger.googlecode.com/svn/trunk/recent-posts-with-titles-only.js"></script>
<script style="text/javascript">var numposts = 10;var showpostdate = false;var showpostsummary = false;var numchars = 100;var standardstyling = true;</script>
<script src="http://blog-address.com/feeds/posts/default?orderby=published&alt=json-in-script&callback=showrecentposts"></script></div><a style="font-size: 9px; color: #CECECE; float: right; margin: 5px;" href="http://helplogger.blogspot.com/2012/04/simple-related-posts-widget-for-blogger.html" rel="nofollow" >Recent Posts Widget</a>
<noscript>Oops! Make sure JavaScript is enabled in your browser.</noscript>
<style type=text/css>
#hlrpsb a {color: #0B3861; font-size: 13px;}
#rpdr, #rpdr a {color:#808080;}
.bbrecpost2 {
padding-top:6px;
padding-bottom:6px;
border-bottom: 1px #cccccc dotted; }
</style>
Step 4. Customize it:
- Change 5 (option 1) and 10 (option 2) with the number of posts that you want to display.
- Change false to true if you want the posts dates to appear
- Change 100 (option 1) if you want more characters to be displayed.
- To change the color and font size of the links, modify the values in blue (links) and violet (font-size)
- To change the style of posts summary, modify the values in green (color) and orange (font size)
- Replace the http://blog-address.com text with your URL

Step 5. Save your widget. And that's it! Enjoy!