Tampilkan postingan dengan label threaded comments. Tampilkan semua postingan

How to Enable Google Plus Comments in Blogger

How to Enable Google Plus Comments in Blogger

Long time ago, Google proudly announced their new integrated commenting system which is now available for users who have created a Google+ profile and connected it with their Blogspot blogs. This way, Blogger users will be able to use Google+ as a commenting system for their blogs, while comments from Google+ will automatically appear on their blogs.
google plus commenting system on blogger

For those who haven't yet upgraded the Blogger profile to a Google+ profile, here's a tutorial on how to associate a blog to a Google plus page. Once you have connected a blog to a Google+ profile, you'll have a new "Use Google+ Comments on this blog" setting on the Google+ tab of your blog. To enable the Google plus commenting system, just check the box next to this setting:

use google+ comments on this blog, blogger tutorial

As soon as you've enabled the feature through your Blogger Dashboard, you'll have the following features:

- Threaded commenting system: the threaded system will allow a reader to reply to other comments on that post, thus the conversations will become much easier, more effective and more enjoyable
- Public and private comments: this ensures a better privacy for your visitors which can make their comments either public or private
- Edit or delete comments: your visitors will be able to edit any comments that they wrote even after publishing, so they don't have to write another comment explaining the correction
- Google Plus One (+1) button in comments: we can up-vote any comment by clicking this button. This is a great feature which could also help you to get some traffic from Google+
- "Also share on Google+" check box: with this option which is right below the comment editor, we will be able to share a specific comment on Google+ and thus get more traffic!

Things to consider before adding the Google Plus Comments in Blogger:

- the Google Plus commenting system won't work for private and adult blogs
- If you are using a third-party commenting system like Disqus, your comments might not be retained when you enable Google+ Comments
- If you change domain name, comments will be gone. Therefore, it would be highly recommended to implement the Google Plus commenting system only after you've decided to use a custom domain name
- If you choose to allow comments pending moderation, you will have to visit the post in order to approve, hide or delete comments before they are publicly visible
- Only registered Google+ users can comment, this means that visitors who don't have a Google+ account will not be able to comment on your blog

How to Enable Google Plus on Custom Blogger Templates


If you are using a custom blogger template, the comments might not show up after checking the "Use Google+ Comments on this blog" setting. In this case, we will need to apply the following trick in order to enable it on custom templates:

Step 1. From the Blogger Dashboard, go to Template and click on the Edit HTML button.

Step 2. Click anywhere inside the code area and press the Ctrl + F keys to open the Blogger search box.
Type or paste the following line inside the search box and hit Enter to find it:
<div class='post-footer'>
Step 3. Just below it, paste this code:
<div class='cmt_iframe_holder' data-viewtype='FILTERED_POSTMOD' expr:href='data:blog.canonicalUrl'/>
Step 4. Click on the Save template button to save the changes... and that's it. Now we should be able to enjoy the Google Plus comments in our Blogspot blogs.

Happy commenting!

Add a Cool Style to Blogger Threaded/Nested Comments

If you need a fresh style to the threaded comments of a standard Blogger template, here's a simple CSS that will help you to apply a different background, make your avatars rounded, add a border with rounded corners and a triangle which is actually an HTML entity to get that speech bubble look on your comments.

You can see a demo here.

To have this style in your comments, all you need to do is to paste the below code inside the CSS part of the template, which is between <b:skin> and </b:skin>

Styling Simple Nested Comments with CSS


Step 1. From the Blogger Dashboard, go to Template and press the Edit HTML button


Step 2. Click anywhere inside the code area and press the CTRL + F keys to open the search box:


Step 3. Paste or type the following tag inside the search box and hit Enter to find it
]]></b:skin>
Step 4. Just above ]]></b:skin> add this CSS:
.comments .comment-block {
background: #F9F9F9;
color: #555;
box-shadow: 0 4px 10px #EEEEEE;
position: relative;
margin-top: 10px;
margin-left: 60px;
padding: 10px;
border: 4px solid #EEEEEE !important;
border-radius:10px;
font: 1.190em/1.2 Cambria,Georgia,sans-serif;
}
.comment-thread li .comment-block:before {
position: absolute;
display: block;
left: -26px;
color: #EEEEEE;
content: "\25C4";
font-size: 30px;
}
.comments .avatar-image-container {
width: 60px;
height: 60px;
max-height: 60px;
margin:0px 0px 0 -28px;
padding: 0px;
border: 7px solid #EEEEEE;
border-radius:60px;
}
.comments .avatar-image-container img {
overflow:hidden;
width: 60px;
height: 60px;
max-width: 60px;
border:0 !important;
border-radius:60px;
}
.comments .comment-thread.inline-thread {
background: none;
}
.comments .continue {
border-top: 0px solid transparent;
}
.comments .comments-content .datetime {
float: right;
font-size: 11px;
}
.comments .comments-content .user a{
font-size: 15px;
color: #498EC9;
}
.comments .comments-content .datetime a:hover{
color: #777;
text-decoration: none;
}
.comments .comments-content .comment:first-child {
padding-top: 0px;
}
.comments .comments-content .comment {
margin-bottom: 0px;
padding-bottom: 0px;
}
.comments .continue a {
padding: 0px;
}
.comments .comments-content .icon.blog-author {
background-image: none;
}

How to Change Blogger Threaded Comments Background, Border and Colors

- replace the #F9F9F9 value to change the background color of the comments;
- #555 to change the text comments color;
- #EEEEEE to change the color of the shadow around comments;
- 4px solid #EEEEEE to change the border width (4px), style (solid) and color (#EEEEEE) around comments;
- 1.190em to change the comments font size;
- to change the arrow color, replace the #EEEEEE value from color: #EEEEEE;
- to change the border width (7px), style (solid) and color (#EEEEEE) around avatars, modify this part: 7px solid #EEEEEE;
- to change the avatars' size and roundedness, change the 60px value;

Here is a tool from that may help to pick your favorite color:
Color Code Generator (after you choose a color, copy the hex value)

Step 5. Finally, click on the Save template button... and you're done!

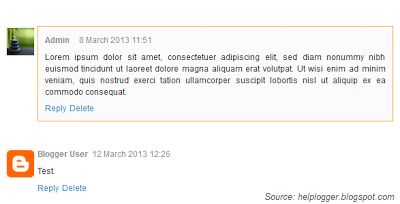
Add a Different Background For Author Comments in Blogger's Threaded Comments

In this tutorial we will learn how to highlight the author comments so that they will have a different background color, border, or anything that makes them stand out from the others. To achieve this, we need to add a code in the Blogger's template and to modify the style according to our preferences.
blogger tricks, blogger comments
  

How to highlight author comments in Blogger:

Step 1. Go to Template, click on Edit HTML

blogger threaded comments, customize blogger comments

Step 2. Click anywhere inside the code area and try to find - using CTRL + F keys - this tag:
</body>
Screenshot:
blogger comments, blogger tricks

Step 3. Just above it, paste the following code:
<script src='http://code.jquery.com/jquery-latest.js'/>
<script>
$(function() {
function highlight(){
$('.user.blog-author').closest('.comment-block')
.css('border', '1px solid #FFA500')
.css('background','#F1F1F2 url("http://www.blogblog.com/1kt/transparent/white80.png")')
.css('color', '#444444')
.css('font-size', '12px')
.css('padding', '10px');
}
$(document).bind('ready scroll click', highlight);
});
</script>

Customizing the Author Comments:


Border:
The line marked in orange represents the border's style.
What it can be done:
  • 1px - you can increase the value to change the border's thickness
  • solid - change the border's style to dotted, dashed, inset, outset etc.
  • #FFA500 - this is the border's color value, change it with your own color
Background:
The line marked in blue represents the background's style. You can use a plain color or an image. By default there's a combination of both (a white transparent image with a gray plain color).
To change/add:
  • a different color: replace the #F1F1F2 value with your own (use this tool to find the hex code of your desired color)
  • an image: replace the defaul url http://www.blogblog.com/1kt/transparent/white80.png with that of your image

Font Color:
To change the font's color, replace the #444444 color value in green with your own. (you can use this tool to find the hex code of your desired color)

Font Size:
Modify the value in red by increasing/decreasing the "12" value in order to change the size of text.

Step 4. Now Save your Template.

To customize the entire style of threaded comments, please check my previous tutorial on How to Customize Comment's Background, Font Color and Border in Blogger.

Numbered comments on threaded comments for Blogger/Blogspot

In a previous tutorial you've seen how you can add numbered comments to your blogger blog, unfortunately, this trick worked only for those who don't have the reply option and are still using the old blogger commenting system. But we won't have any problem this time because this tutorial will show you how to add numbered comments with comment bubbles on the threaded comments, as well ;)

What the following CSS trick will do for you:
  1. When the general block of comments is initiating (.comments-content) a counter called countcomments activates and starts with an initial value of 1. 
  2. Then, each time the code flow goes through a review of any level, either the original comment or a reply (.comment-thread li), it will bring us in front (:before) of the comment's body the number that is the counter.
  3. Finally, this is incremented in the counter (counter-increment).
See the screenshot:
count comments, comment bubble, forum, blogger

Isn't that great? I'm pretty sure many of you have been waiting for this cool trick. So, let's begin applying it for our threaded commenting system.

Steps to add bubble comments count

Step 1: From your Blogger Dashboard, go to Template and click on the Edit HTML button:

    ... click anywhere inside the code area and press CTRL + F to open the Blogger' search box.

    Step 2: Type the following tag inside the search box and hit Enter to find it:
    ]]></b:skin>
    Note. you have to click on the arrow next to it, then search the ]]></b:skin> one more time 

    Step 3: Add the following code just above ]]></b:skin>:
    .comment-thread ol {
    counter-reset: countcomments;
    }
    .comment-thread li:before {
    content: counter(countcomments,decimal);
    counter-increment: countcomments;
    float: right;
    z-index: 2;
    position:relative;
    font-size: 22px;
    color: #555555;
    padding-left:10px; 
    padding-top:3px; 
    background: url(
    https://blogger.googleusercontent.com/img/b/R29vZ2xl/AVvXsEg4eNWddTU6zUfeXENPFeixqIIEbf8fpiLalZBCzDYx-azroADqXRPf1pQCqlfjhADAYqSeFxx036cLwGsI7bVZ59k-_X3VYdKoUNJs7gkIK781kSOZVj_Uce12OCHv3Oefv4OX9jutAuo5/s1600/comment+bubble2.png) no-repeat;
    margin-top:7px; 
    margin-left:10px; 
    width: 50px; /*image-width size*/
    height: 48px; /*image-height size*/ 

    }
    .comment-thread ol ol {
    counter-reset: contrebasse;
    }
    .comment-thread li li:before {
    content: counter(countcomments,decimal) "." counter(contrebasse,lower-latin);
    counter-increment: contrebasse;
    float: right;
    font-size: 18px;
    color: #666666;
    }
    Note:
    • if you want to have no bubble icon, remove the code in red (including the address in blue)
    • to change the comment bubble, replace the code in blue with the URL address of your own icon. If you're not sure what icon you should use, you can find some cool icons in my previous posts (see these tutorials here and here)
    • to change the position of comments count, increase/decrease the values (3 & 10) from padding-top and padding-left
    • to change the position of comments bubble/icon, change the values (10 & 7) from margin-left and margin-top
    Step 4: Now Save the Template and you're done!

    If you enjoy reading this blog, please share and subscribe. For any questions you may have, leave a comment below.

    How To Remove Blogger Threaded Comments

    The Blogger Threaded commenting system allows a reader to reply to other reader comments on that post. Blogger supports threaded commenting with two levels - the original comment, and the replies to that comment. If you want remove threaded comments from your blogger blog, follow these steps:

    Important!
    Before anything, we need to make a back-up of our Blogger template so that if we do make any major errors, we can easily restore the original working template to our blog.

    To make a back-up of your Blogger template, from your Blogger dashboard - go to Template and click on the "Backup/Restore" button on the right side.
    Clicking on this button, will prompt you to save your existing template as an XML file to your hard drive. You can change the name of the file and choose the location to ensure it is easy to find if you need to use this later.

    Removing the Blogger Threaded Comments (with reply option)


    Step 1. Go to Template and click on the Edit HTML button

    blogger template edit html

    Step 2. Click anywhere inside the code area and press CTRL + F keys to open the Blogger' search box 


    Step 3. Paste or type the following code - or the first line of it - inside the search box in order to find it:
    <b:if cond='data:post.showThreadedComments'>
                <b:include data='post' name='threaded_comments'/>
              <b:else/>
                <b:include data='post' name='comments'/>
              </b:if>
            </b:if>
            <b:if cond='data:blog.pageType == &quot;item&quot;'>
              <b:if cond='data:post.showThreadedComments'>
                <b:include data='post' name='threaded_comments'/>
              <b:else/>
                <b:include data='post' name='comments'/>
              </b:if>
            </b:if>
    Step 4. Now remove it (you'll find this code twice and replace it twice) and paste this code instead:
       <b:include data='post' name='comments'/>
              </b:if>
                   <b:if cond='data:blog.pageType == &quot;item&quot;'>
                         <b:include data='post' name='comments'/>
         
            </b:if>

    Step 5. Save the changes by clicking on the Save template button.

    That was all!